
Replacement/Resurfacing of Brake Rotors on 2003 – 2007 Accord
Here I document the procedure for replacing your front brake rotors (aka brake disc). I rather resurfaced mine than replace as it was still within limits. What made me do this? My front discs were warped and caused steering wheel vibration during braking at high speed. The brake pedal would also pulse while the steering wheel vibrated. Just in case you’re having these same symptoms; you most likely have warped rotors! Discs get warped due to a whole range of factors e.g. over-torquing lug-nuts, excessive frequent hard braking and holding onto the brakes after each episode etc.
Should rotors be changed or resurfaced?
This would depend on the thickness of the rotor and the degree of imperfections that would need to be shaved off the rotor. Rotors will usually have a minimum thickness below which it should not be trimmed any further. This limit is usually stamped on the disc. Some owners manuals will also list this minimum thickness. For this model, the minimum thickness which must be maintained on rotors is 21mm or 0.83inches. To resurface, you will need access to a machinist who owns an appropriate lathe.
Materials:
Jack, support stands, 12mm & 17mm wrenches, replacement rotors, new brake pads, and a screw driver.
Steps:
1. Remove front wheels: slacken lug nuts, jack up and place car on support stands. As a rule of thumb, never work under an unsupported vehicle.

Car on support stands
2. Remove the rotor retaining screws: These 2 screws can sometimes be a bear to remove. If the screw heads get stripped, you can drill them out or screw in two 8mm bolts into the two threaded holes on the rotors. Tightening the 8mm bolts a little at a time will force the rotor out. In the image below, the bigger holes are for the retaining screws while the smaller ones are the threaded for 8mm bolts.

Rotor retaining screws off
3. Remove the brake callipers: Loosen the 12mm bolt securing the brake line to the knuckle. Then, remove the two 17mm bolts mounting the calliper to the hub. The 2nd bolt is right beneath the highlighted one in the image below.
Upper calliper mounting bolt
You can set the callipers with the brake pads on the lower control arm to prevent it being suspended just by the brake line.

Brake calliper resting on lower control arm
4. Remove the rotors: With the above removed, the rotor is free to come off. Simply pull out.

Rotor being removed.

Rotor removed, exposing the hub
5. Resurface the rotors (brake disc):
I then took my rotors to a machinist who resurfaced them on a brake lathe…

Brake rotors being resurfaced on a lathe

Resurfaced brake disc
6. Some anti-seize… Before replacing the refinished rotors, apply anti-seize to the retaining screw holes and to the screw threads themselves. This will ensure your next removal comes off easily.

Applying anti-seize to the screw holes

Anti-seize applied to rotor retaining screw
7. Install new brake pads & follow reverse steps to complete:

Resurfaced rotor being mounted.
Torque for the calliper mounting bolts is 108Nm and that for the brake line bolt; 12Nm.
NB: New pads are recommended after resurfacing because warped rotors will usually wear pads unevenly. Replacing the pads with the discs will ensure you do not loose braking performance.
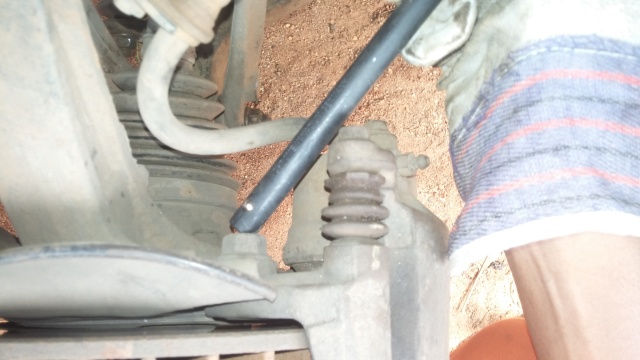
You may need to push in the calliper piston with this technique if you don’t have C-clamps…

Calliper piston pushed in with a bar
Also remember to properly break-in your new pads. Honda advises that for the first 200miles as much as possible hard breaking should be avoided in the break-in period.
Hope you found this helpful. Any thoughts or questions? I’ll be glad to hear them. Do have a fulfilling week!
Great info! I have same issue on my V6 -2008-09
Thanks Guz. The rattle can be annoying, trust you’ll get it sorted soon
The pictures that you posted to go along with the steps are going to really help me when I try doing this later. It is helpful because I have a visual of the parts I need to be looking for. Without this I would be confused what the 12mm bolt is securing the brake line. Now I can help my husband later when we replace the brakes later!